IZBR
Hi! My name is Isaac Basque-Rice, I'm A Security Engineer and former Abertay Ethical Hacker, and this website is a repository for all the cool stuff I've done, enjoy!
Project maintained by IBRice101 Hosted on GitHub Pages — Theme by mattgraham
Minesweeper Reverse Engineering Workshop
This is a guided workshop session based on this challenge. This page specifically is supposed to serve as a walkthrough for beginners to RE. Use this guide as a sort of last resort if you need help with certain sections.
NOTE The winmine application is solely Windows-based so we’ll have to use Windows here, as opposed to Linux.
If any of this doesn’t make sense of you need any help whatsoever, I’ll be around to help, either in real life if we’re in hacksoc, or on discord as EyeSack#5624
Thanks to Hubert (@__H#6596) and Sunny (@Praeceps 🍋#1609) for their help working out some of the kinks.
Why?
Reverse Engineering is one of the hardest and (in my opinion) most rewarding things in security, figuring out how something works just so you can break it (or, indeed, fix it!) is at the very core of the hacker mindset, and whilst this workshop isn’t directly dealing with security stuff (no malware unfortunately, fuck the risk assessments and I don’t want to confuse anyone) it serves as an introduction, and hopefully I can share my enthusiasm for the topic with everyone here.
Another reason I’m doing this, really, is to show you my favourite methodology for learning a new tool. Using new and complex tools (like Ghidra, Metasploit, Nmap, any programming language, hell, even Linux itself) can be quite daunting, but this methodology (with some help from Game Maker’s Toolkit) has been really beneficial for me
- Learn or be taught the very basics of the tool <- YOU ARE HERE
- Familiarise yourself with the basics through repetition
- Slowly build on your knowledge by getting more and more bold with what you want to do
This incremental model of learning is brilliant and has helped me learn all kinds of tools, including this one, even without knowing it. It allows you to be able to get started on anything with at least some degree of confidence (the first and often hardest step for any procrastinating brain) and absolutely crucially, it also gives you a repertoire of words you can use to google anything you need should a problem arise. Google is the most powerful tool in your arsenal by a long shot, use it (or any other search engine, ofc).
What?
Today we’ll be reverse engineering Minesweeper. I adore Minesweeper, I’ve lost hours of my life to this little game (especially when I should be doing other things) And I’m sure a few of you have too.
If you’re unfamiliar with the game, lets go over a few of the basics.
Minesweeper is a point and click game developed by Microsoft originally for Windows 98 to get people used to using the mouse (that’s how old this is lmao). Clicking on the field will reveal some numbers, these numbers represent how many mines that number is touching, so for example a number 1 is touching 1 mine, 2 is touching 2 mines, and so on. The object of the game is to place flags on mines by right clicking the space where you expect them to be, you win when you have flagged every mine on the board.
Let’s say, though, that you’re lazy and can’t be bothered actually playing the game, you just want to win immediately and have every mine flagged automatically. That can’t be done without some scripting stuff, or some AI programming video you watch at 1AM instead of doing your coursework, right?
WRONG! Using some Reverse Engineering wizardry you can do just this in no time at all.
We’ll be using an old version of Minesweeper today, available here. If you’re like me, this will give you an overwhelming wave of nostalgia for a simpler, Windows XP based time.
How?
We’ll be using Ghidra for this. Ghidra is a reverse engineering tool developed by the NSA and released under… dubious circumstances back in 2018. This tool is super powerful, it has a debugger for dynamic analysis (although its a little difficult to set up, we won’t be using it or reasons I’ll explain later on), a decompiler that displays code retrieved from the binary in a more readable (C-like) format, and automatic PE Header analysis (PE headers are also expanded upon a bit further down). If I’m being honest, this workshop is mostly to show off Ghidra and make you aware of how to use it, because I love it (and Radare2 but that’s for another day).
Why Ghidra?
There are plenty of other reversing tools available, IDA and Radare2 are both excellent frameworks for reverse engineering, however we won’t be using them in this workshop for a few reasons.
Regarding IDA, whilst it is arguably the gold-standard, so to speak, of the reverse engineering world, the free version is very limited, it doesn’t even have a decompiler, whereas Ghidra is free and open source, meaning you get 100% of the software at the low low cost of £0 (plus the uni doesn’t have an IDA license lol).
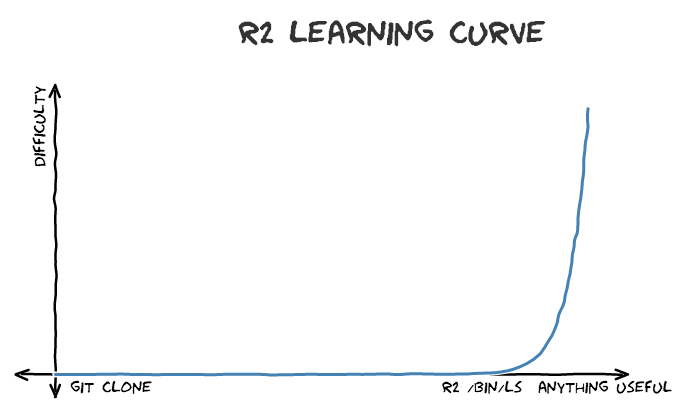
Radare2, on the other hand, is also free and some would say more powerful, quicker, and better to automate using the r2 API. Where it fails, however, is in usability. Its learning curve is immense (see graph below) and it would be, frankly, cruel to drop it on anyone without the proper knowledge of basic RE, this is a beginner workshop, after all. If, after this, you wanna have a go at it, check out their Git Repo and this handy guide.
Here is an article comparing all the main RE tools (Cutter is a GUI version of r2).
Decompiler and Assembly Windows
In Ghidra the two main windows you’ll be working from are the Assembly (Listing) and Decompiler windows. The former of these shows the assembly code (touched on later) taken directly from the program, it does this by reading the file you’ve chosen character by character looking for specific symbols it knows relate to instructions. If you’ve ever opened an executable in a text editor you know that it just appears like a jumbled mess of random garbage data. Of course, it’s not really random, it’s just your text editor doing its best to translate the numbers that actually form the instructions for the computer into ASCII or Unicode format. An assembler is much like a text editor in this way, but instead of displaying it in ASCII, it has a database of what these numbers mean and, hence, can translate them into human readable format.
A disassembler, however, is somewhat more complex. The idea behind it is to take the aforementioned assembly and convert that back into code that looks human written, often in a C-like syntax. This means it’s easier for us to read and understand, but often at the cost of losing some context. For applications that use the Common Language Runtime (.NET apps like C# and Visual Basic) or the Java Virtual Machine (Java, Kotlin, etc.) this is relatively straightforward, as these languages have a closer relationship between byte-code (like assembly) and the actual human-written code for reasons outwith the scope of this workshop. Truly compiled languages, however, are much trickier because that close relationship isn’t there necessarily. A decompiler relies on artefacts left in the code to recreate the structure of the original program as written, which is often scrubbed away so to speak. The full way by which a decompiler works is a talk unto itself, but man is it complex. Here is a section of a Wikipedia article going into more depth if you’re interested.
So under what circumstances would you use one over the other? In short, a decompiler’s code is easier to understand at a glance, you have variables and loops and conditionals and all this wonderful stuff we’re all used to as developers, it’s for the same reason we aren’t all writing every program we make in Assembly (other than that wonderful loon who made Rollercoaster Tycoon (I’m a poet and I wasn’t even aware of that fact)). So surely you should always use the decompiler, no?
NO! The decompiler has many wonderful benefits, but really sometimes we do need to use a disassembler. Firstly, decompilers are never perfect, not really. To properly understand what’s going on in specific sections of code we need to know what’s happening at a really low level and use our wonderful human brains to figure it out ourselves, have a greater understanding and so on. It’s also useful in cases regarding symbolic analysis, code similarity or maybe something like fuzzing where actual high level representation may not be needed.
How to Install Required Tools on Hacklab Machines
The tools we need are unfortunately not available on the hacklab machines as default, this section wil go over how to install each of the things we need for this workshop.
NOTE: I may also make a Dockerfile available if I can figure it out, lol
Installing JDK 11
JDK 11 (or higher) is required for Ghidra to work properly, unfortunately it does not come on the hacklab machines so we will have to install it
- Go to this link
- Click “x64 Installer”
- Download the JDK
- Go through the steps in the Wizard
Installing Ghidra
- Visit the Ghidra website
- Click “Download from GitHub”
- Download the latest version, should look something like “ghidra_10.1.4_PUBLIC_20220519.zip”
- Once downloaded extract it to the desktop
Installing OllyDbg
- Click this link
- Extract to desktop
The Challenge
Approaches You Can Take
You have two methods of tackling this, really, either as a programmer, or as a GAMER, both are equally valid options, of course, although we will only be going over one.
To understand the two options it is necessary to know that Minesweeper is both a GUI application and also a data structure, that being a 2D array of randomised values where 2, for example, is “is flagged” (this is after a user has interacted with it, of course), 1 is “has bomb”, and 0 is “does not have bomb”. Note that these aren’t the real values found in the code, but they’re just used for illustrative purposes.
The GAMER option is to treat Minesweeper as a primarily GUI application and have the patched version draw a flag everywhere where there is a mine, changing the printing function. In Oversimplified C++™ this would look like this:
bool board[81];  // the game board can be of varying length but the "beginner" mode is 9x9

if (board[i] == true){ // meaning if it has a mine on it
    plant_flag(); // calling a function already inside the codebase
} else {
    print_empty();
}
The programmer (cool) way is to treat it solely as an array (just that we don’t know the values of yet). This way we can just follow the same steps the program takes to determine the location of the mines currently and replace them with a flag.
int i;
int board[81]; // the game board can be of varying length but the "beginner" mode is 9x9

for (i = 0; i < sizeof(board); i++) {
    if (board[i] == 0) { // if empty
        continue; // do nothing
    } else if (board[i] == 1) { // if mine
        board[i] = 2; // plant flag
    } else if (board[i] == 2) { // if flagged
        continue; // do nothing
    } else {
        // throw error
    }
}
This was chosen because it can be represented entirely in code, and also, to be honest, it’s a little more of a challenge so I though it’d be fun. Feel free to do it either way yourself, though.
Setup
On the computer in front of you should have a copy of Ghidra, as mentioned previously this is the primary reverse engineering tool we will be using for this walkthrough. Ghidra is started by locating and running the ghidraRun binary, like you would any other application. Once Ghidra is opened, you can either press Ctrl+N or go to File > New Project to open up a new project.
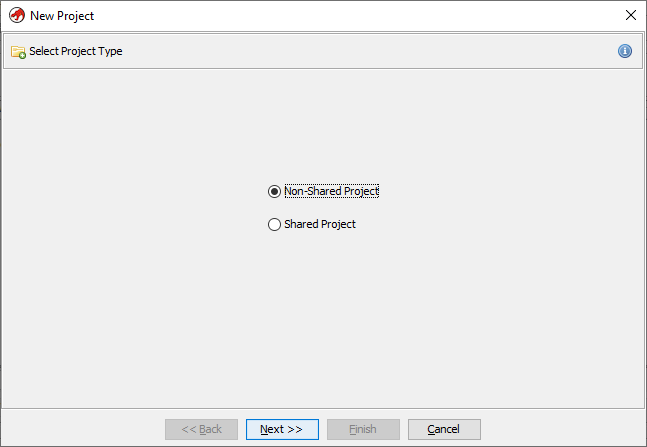
At this stage you should be greeted with the New Project wizard. The first option you will have is to create either a “shared” or “non-shared” project. You want “non-shared” at the minute. Shared projects are great for working in teams on one specific piece of software, but as this is supposed to be an individual task, and for simplicity’s sake, it’s best to just go for non-shared
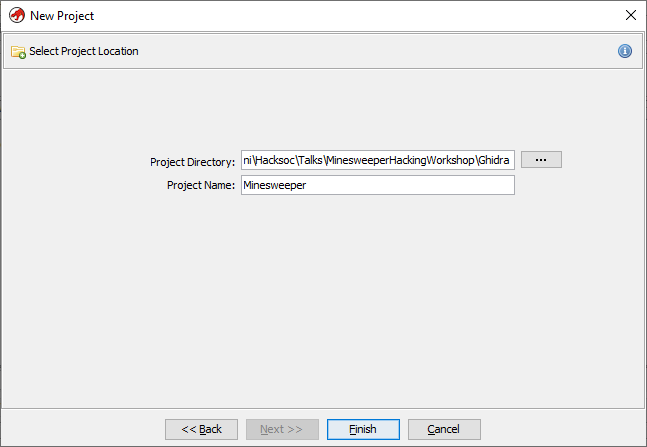
Next specify where you want to save the project files. I recommend creating a new subdirectory, wherever your Minesweeper application is, called Ghidra and saving it in there, as you can see in the image below. This is more for consistency and neat file structure’s sake than anything else.
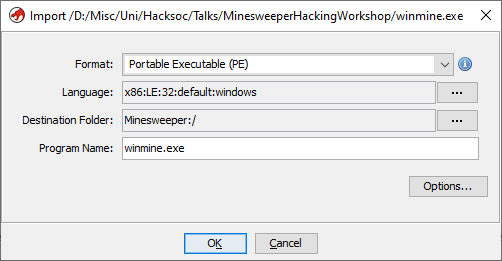
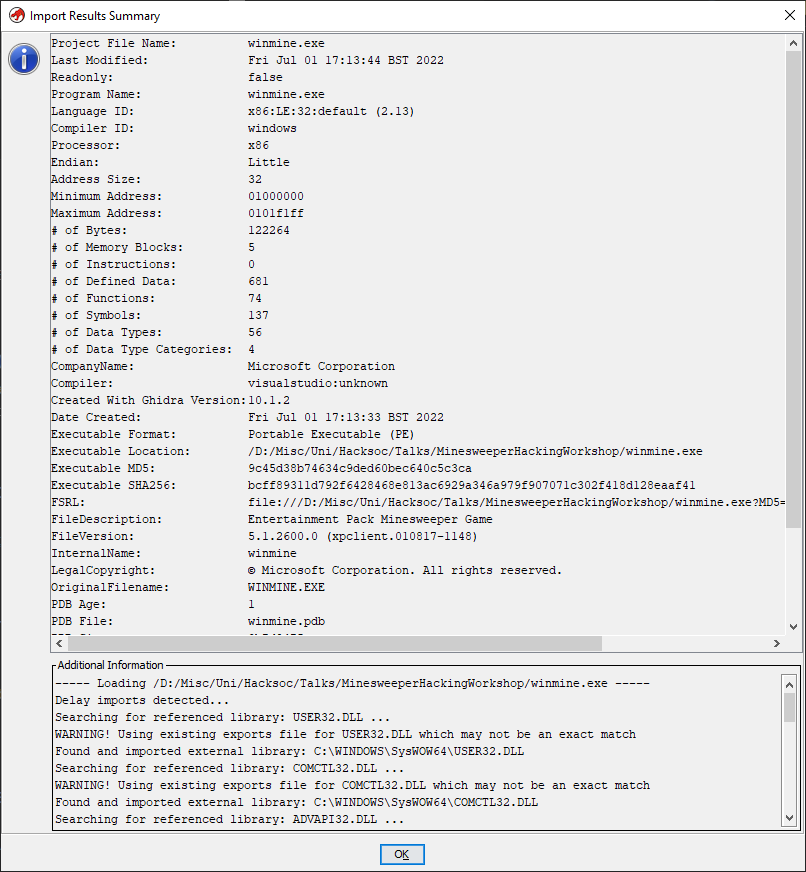
Once this is done its time to import the actual binary/exe file into the project. This can be done either by pressing I on the keyboard or going to File > Import File..., and then locating the Minesweeper executable wherever you have it placed. Doing this will result in a popup telling you this file is a Portable Executable (PE) File, which is the file format in windows for all binaries, Libraries, System Files, and so on. It will also give you information about the “Language”, meaning the assembly language type, x86 in this case, the destination folder, and the name of the program
Once the Ok option is selected, you’ll be shown a fairly large amount of information about the file, this is known as the PE File Header and contains all the metadata for the program, including the language and compiler ID, modification and creation time, copyright info, and other such info.
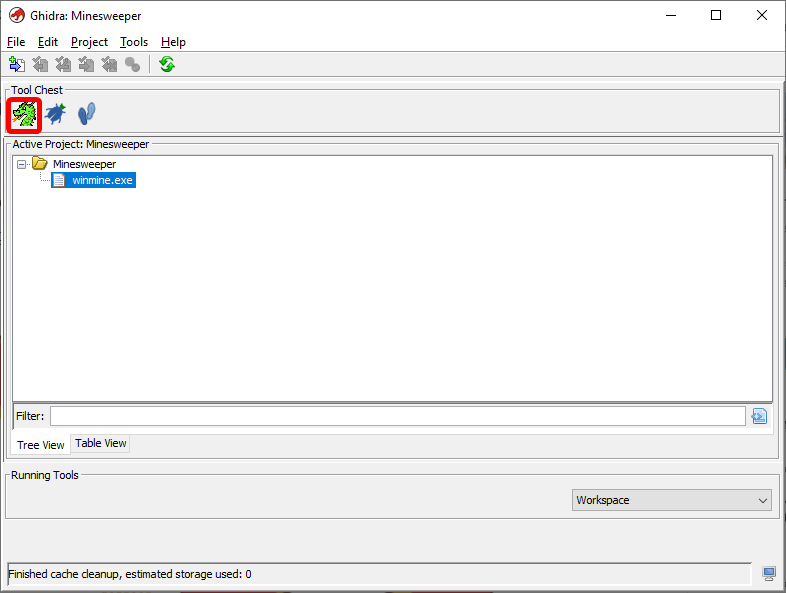
As soon as this is dismissed you’ll be nearly ready to analyse. To get into the actual code viewer you need to press the little dragon icon under the “Tool Chest” heading, shown highlighted below.
This will take you to an empty code browser view. Use Ctrl+O or File > Open... to open winmine.exe in the code browser itself. Following this you will be prompted to analyse the executable. Click Yes followed immediately by “Analyze”. There are unticked options available to you but they are in beta and/or will likely not be helpful to you. If you like you can read through each of these and try to work out what each of them do, or don’t, I’m not your mum.
A Quick Primer on Assembly and Reverse Engineering Anchor Points
Assembly
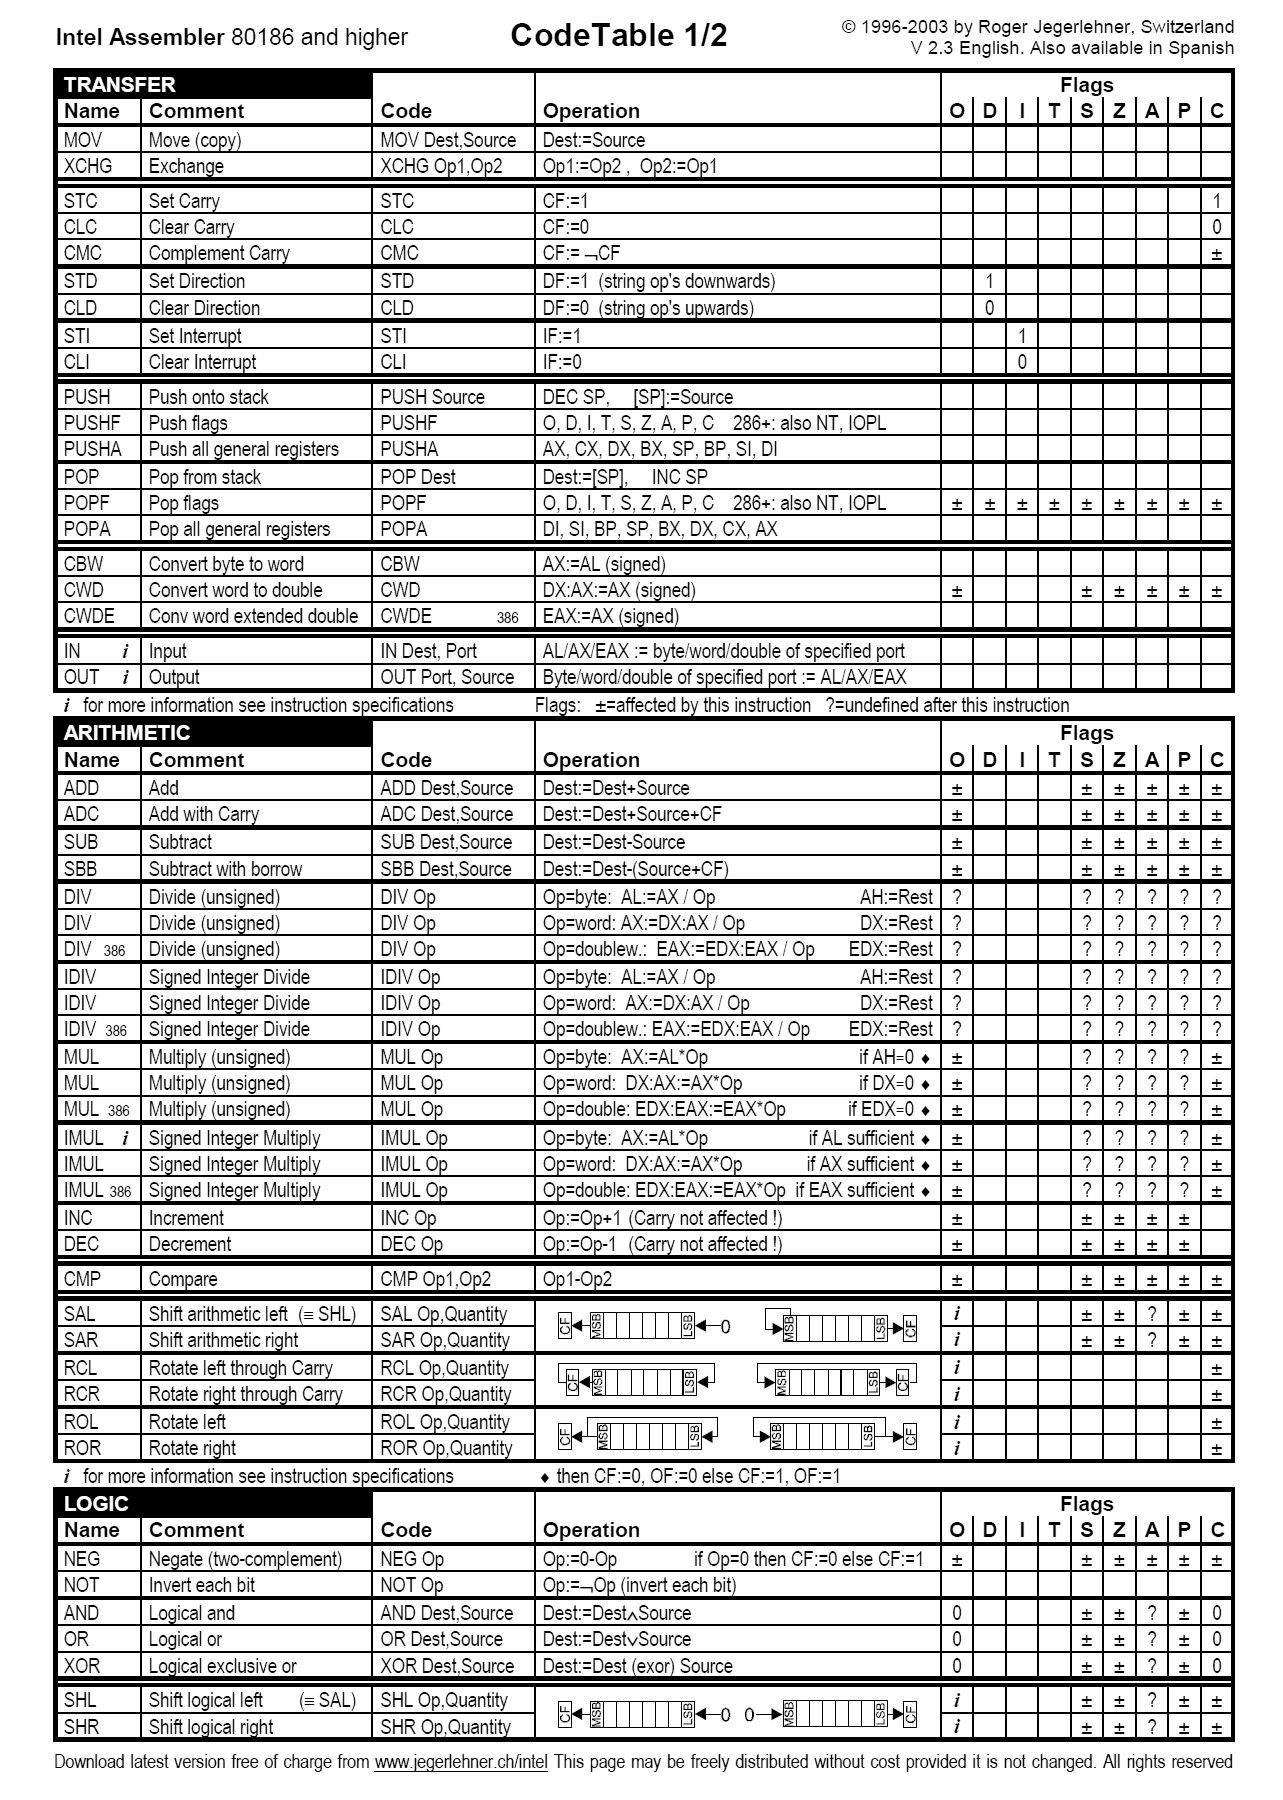
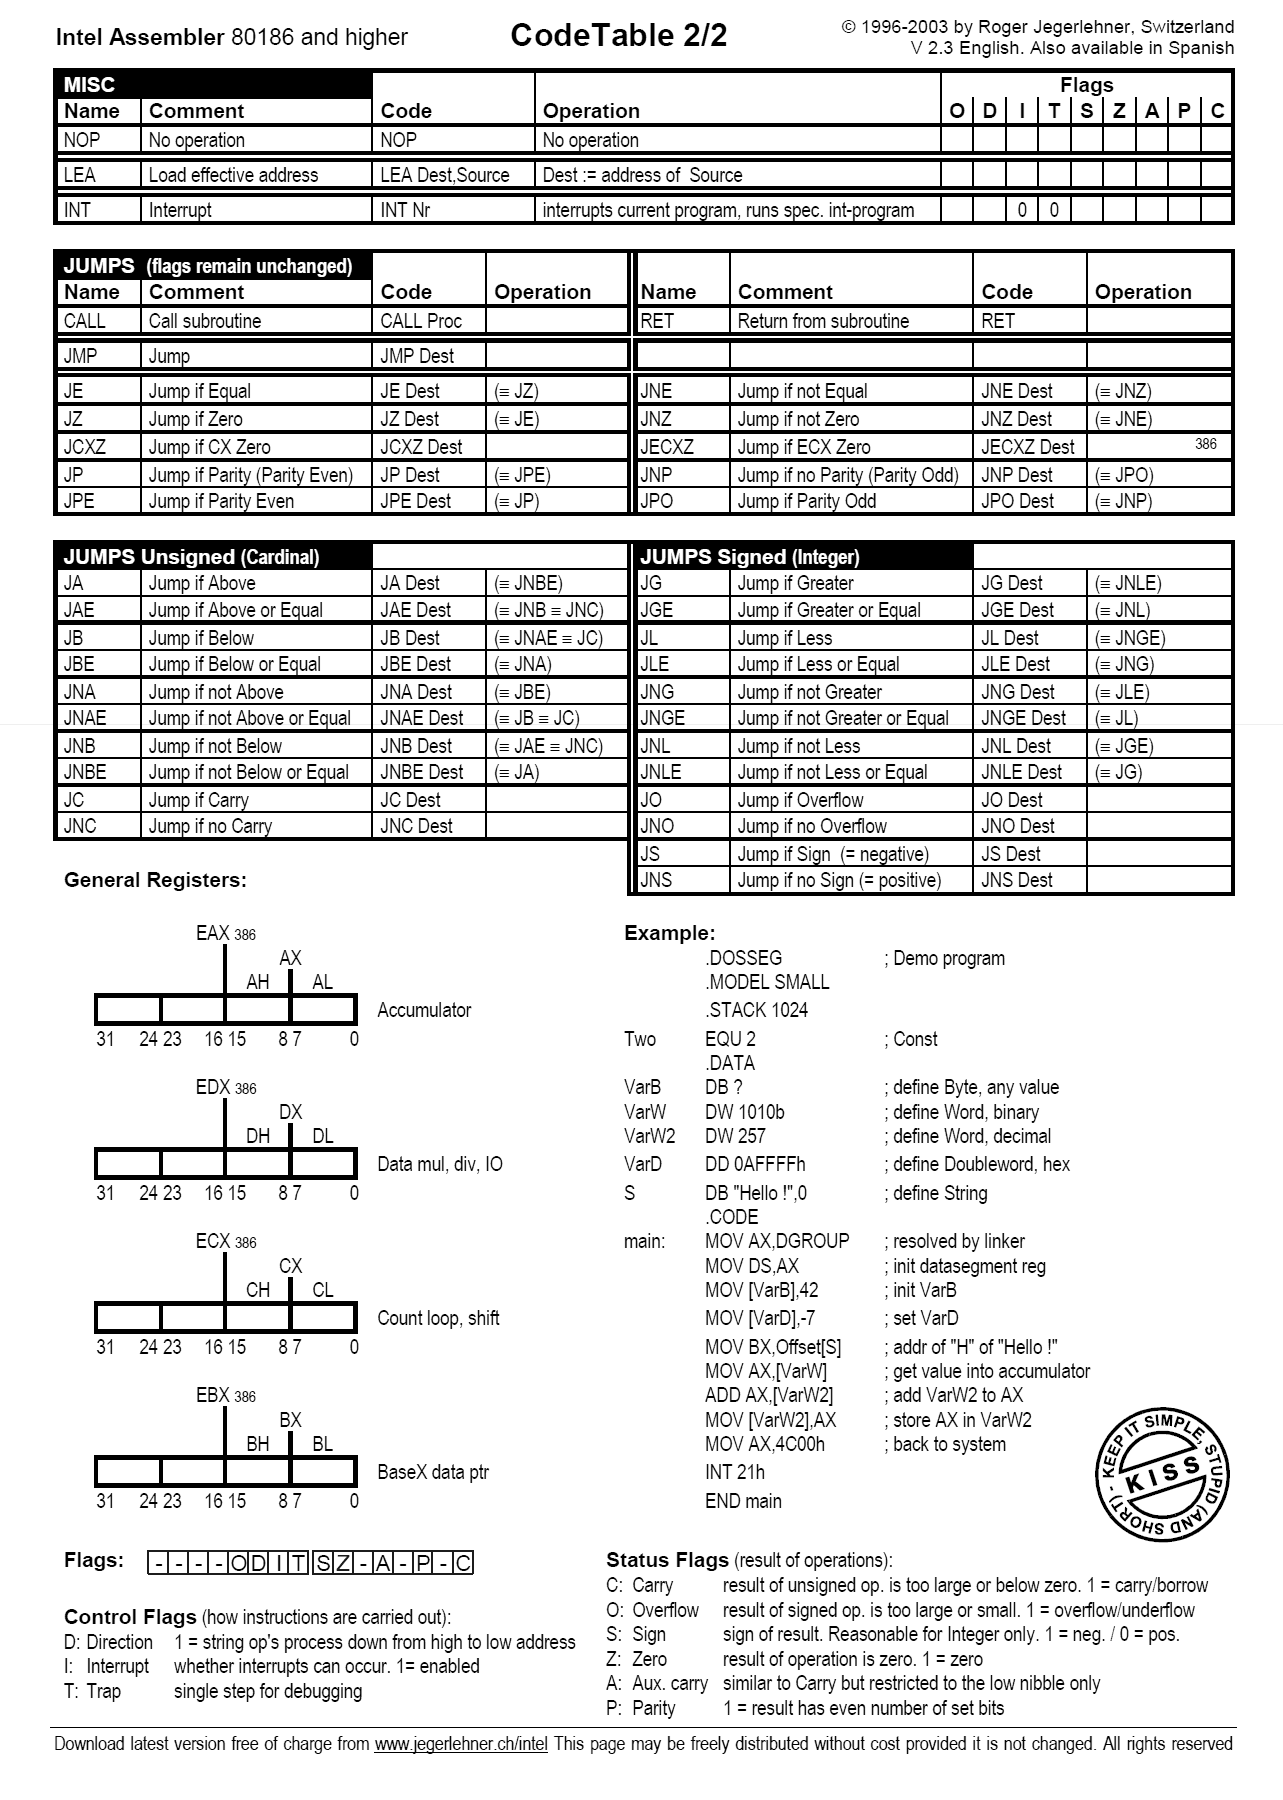
Assembly language makes use of so-called “mnemonics”, which can be thought of as keywords or operands on a set of data. In Intel syntax (one of two kinds of syntax for assembly language along with AT&T), when performing an operation on two values, the second operand always moves to the first. For example in MOV eax, ebx, the contents of the ebx register are moved into eax. Most everything else about Assembly language at this point is simply knowing what specific mnemonics do (look at the non-exhaustive cheat sheet below), and being able to think on a micro scale about each of the operations being performed when a program is run.
But what is a register?. A register (at least on a 32-bit platform) is a small memory location on the CPU that allows it to access data much quicker than pulling from RAM. There are four general-purpose 32 bit registers (EAX, EBX, ECX, and EDX), which can be subdivided into 16 bit data registers (AX, BX, CX, and DX), and further subdivided into 8 bit data registers AH, AL, BH, BL, CH, CL, DH, and DL. There are also two more 32 bit registers (ESI and EDI) which can be divided into 16 bit registers (SI and DI), and pointer registers (EBP and ESP) which are responsible for telling the computer where the stack is.
Another important register in reverse engineering is the status register. This register is a collection of status bits that each represent a specific aspect of the system as it exists at a specific point in time. In x86 architecture, what Minesweeper (and most programs you interact with on a daily basis on a PC) runs on, this register is called FLAGS, and contains 16 bits of note (there are 32 and 64 bit additions to this register but to prevent confusion I will stick to the 16-bit version for now). The purpose of each of the flags can be seen in the image below.
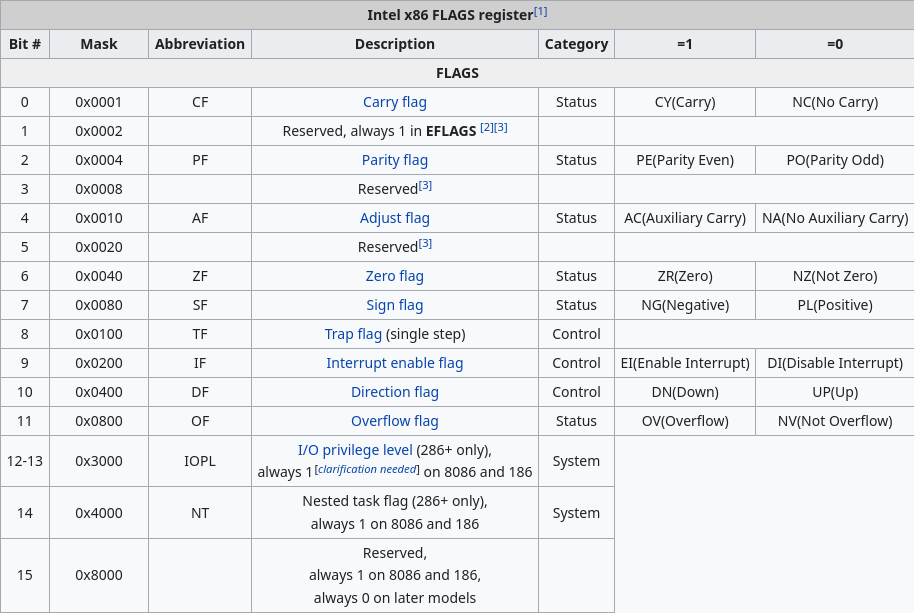
Of particular note here is the ZF, or Zero Flag. This flag is crucial to a number of arithmetic and code expressions, as it checks whether the value most recently operated on is equal to zero or not. This is checked using the JNZ (Jump if Not Zero) operation which instructs the program to jump to a specified location if ZF == 0, i.e., the ZF is NOT set. It can get confusing sometimes in Assembly land lol.
Anyway, this instruction is so important because it forms the core of both conditional statements and loops. Let’s take a for loop as an example, a common for loop looks like this
for (int i = 0; i < 5; i++) {
  cout << i << "\n";
}
What is actually happening here is that the value 5 is being moved to a register, the cout operation is performed, the value is decremented, then a comparison (CMP) operation is performed and if that value is 0 then the loop is done, otherwise continue to the top of the loop. In reality you’ll often find JLE instead of JNZ in loops for the sake of loops that increase in value, but this instruction is synonymous with JNZ as they both check if the ZF == 0 through a CMP operation immediately prior. If statements are much the same, if (x == y) still results in a comparison that uses JNZ.
If you are unsure about any specific mnemonics or, in fact, anything at all in Ghidra, you can always refer to the help window, accessed by pressing F1 on the keyboard. Specific instruction information can be accessed by clicking the instruction, right clicking, then going to Instruction Info.... Otherwise, of course, consult myself or the Internet.
Anchor Points
A so-called “anchor point” is something within the program that you, as a reverse engineer, can use to anchor yourself to as a setting off point in the process of reverse engineering. In this walkthrough we will primarily be interested in shared libraries, that is, external, often OS-specific libraries the program pulls from to perform specific actions, such as rand for generating a random value. These are by no means, however, the only anchor points you can use. Objects such as strings found in the software, logs, and the entry point of the program can also be used.
Other shared libraries can also be used, such as networking libraries, file access libraries, and GUI libraries are all useful and valid methods of gaining more knowledge about the inner working of the program, use your own discretion and common sense and you’ll rarely go wrong.
Getting To The Minefield
Now we’re into the meat of the reversing process. Unfortunately, this executable has no “debug symbols”, what you’ll probably know as identifiers, or variable and function names. This isn’t necessarily ideal from a reversing perspective, but from a learning perspective is pretty good, as it prompts you to really learn what each of the functions and variables actually do and how they actually work, as opposed to simply going off the identifier. I also get to teach you how to rename files!
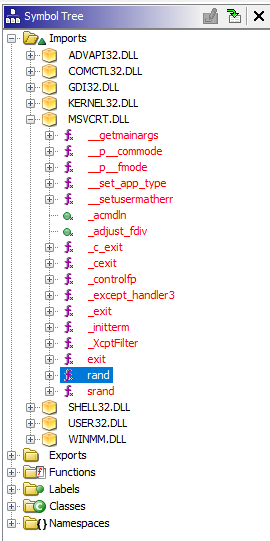
So… Remember how I said earlier that Minesweeper is “a 2D array of randomised values”? This is where that really comes into effect. We need to find where the minefield is in code. The first step to solving this challenge is to realise that the developers had to randomise this somehow, and the most likely way of doing that is by using rand(), a function inside the MSVCRT.DLL file, that has likely been imported. This will be our anchor point. In the Symbol Tree, on the left of the screen, you will see a collection of directories that the program has kindly generated for us. To find rand go to Imports > MSVCRT.DLL > rand, as illustrated below.
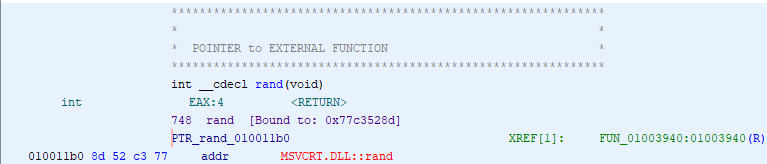
Clicking on this directs us, inside the Listing window, to a location in the assembly code which is a pointer to an External (rand) function. This pointer has a single XREF (pronounced cross reference) to function FUN_01003940
Going to that function shows the following code in the Decompiler window:
int FUN_01003940(int param_1)

{
    int iVar1;

    iVar1 = rand();
    return iVar1 % param_1;
}
We will be calling this function rand_caller, rename a function in Ghidra by right clicking it and clicking Rename Function, or by simply pressing L on the keyboard.
rand_caller
So what does rand_caller actually do?
Well, often instead of relying purely on the decompiler as our only source of information, it’s better to try to read some assembly! Don’t worry, it’s not as daunting as it seems.
The full disassembly of the rand_caller function can be seen below.
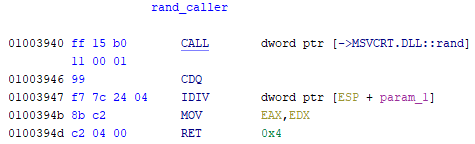
And here is a step by step guide to what all this means:
CALL dword ptr [->MSVCRT.DLL::rand]- Call the random function from its Dynamic Link Library, stores the result in theEAXregisterCDQ- Convert doubleword (dword, 4 bytes) to quadword (qword, 8 bytes), AKA convert an int to a double. This command expands the value in theEAXregister such that the value is now stored in theEDX:EAXregister pair (two registers acting as one) for the next instruction.IDIV dword ptr [ESP + param_1]-IDIVdivides the contents of theEAX:EDXpair by the operand value, which is the address of the stack pointer (ESP) + the “offset” (memory location) ofparam_1, after which it stores the quotient inEAX, and the remainder intoEDX. This is essentially synonymous with a modulo operation, to get the remainder of a number divided by another numberMOV EAX,EDX- Move the contents of EDX into EAX, Additionally, “the fact that EDX is moved to EAX right before the function returns implies that the relevant value is the division remainder”.RET 4- Return 4, although this is essentially irrelevant.
So we now know that rand_caller calls rand and then ensures that the result does not exceed param_1, we know this because the remainder of any modulo operation is always less than the number the original value is being divided by. If this doesn’t make instinctive sense to you, I encourage you to use an online C compiler such as this to recreate the code and plug values in.
Knowing that, now we can move on to the XREFs. This function is referenced twice in the same function, FUN_0100367a… This is interesting, no? Don’t forget we’re looking for the minefield generator here, and where else would the minefield be located but where rand_caller is referenced??
In the function itself we find rand_caller being referenced within a nested do..while loop, So we can begin our analysis there.
NOTE: Making use of the decompiler window I have taken the liberty of renaming the variables to which rand_caller() is set rand_1 and rand_2, this makes reading the assembly easier as the ghidra disassembler very cleverly is able to work out what’s relevant where.
The Loop
For this piece of reversing we’ll be making use of Ghidra’s excellent Function Graph utility (seen below). You can access this by going to the top nav bar and clicking the 7th button from the left (looks a bit like an upside down tree).
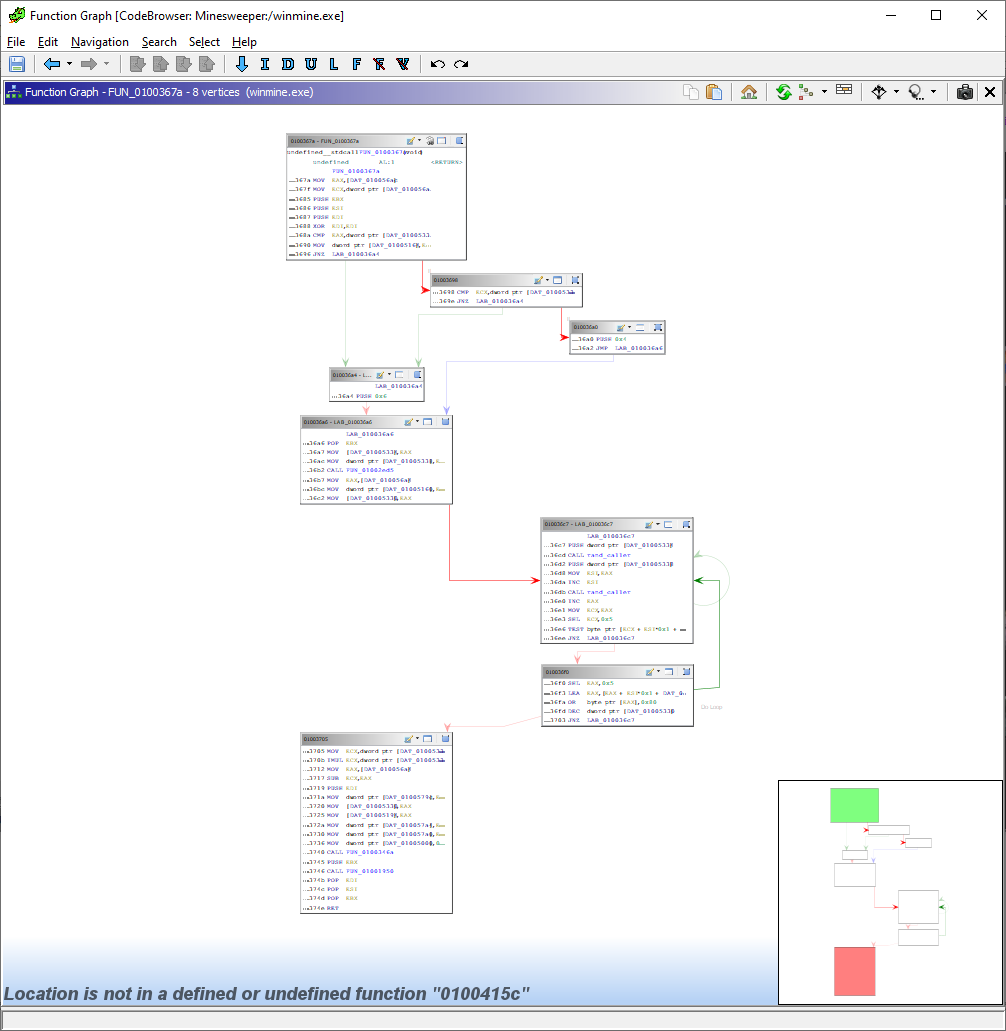
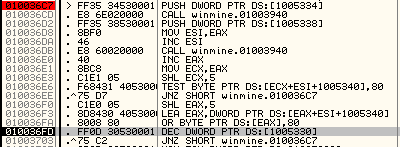
In particular we’re focussing on the structures at offsets (locations) 010036c7 and 010036f0, which are where the two loops we’re interested in are.
What Are We Looking At?
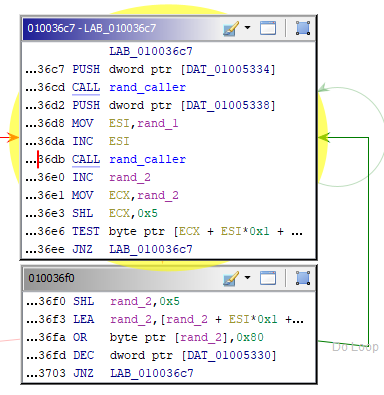
So what are we actually looking at here? Firstly we have LAB_010036c7, which is a label that allows us to jump back up to the top if a specified value is not zero (that’s what JNZ does). After this we push a DAT_ value onto the stack, this often means a global variable or something of that nature. We call rand_caller on this and that bit’s done there.
Next we push a second value on the stack, but instead of immediately calling rand_caller() we move rand_1 to the ESI register (which is traditionally used for memory array copying) and increment that by 1.
After this rand_caller is once again called on rand_2, it also gets incremented, and moved to ECX. This time, however, it gets bit shifted left (SHL == Shift Left) 5 times, thereby multiplying the value by 32.
All in all rand_1 == DAT_01005334 + 1 && rand_2 == (DAT_01005338 + 1) * 32. If this doesn’t make sense to you, call me over or message me on Discord and I’ll explain :).
Following on, we have the command TEST byte ptr [ECX + ESI*0x1 + DAT_01005340],0x80. This sums rand_1 and rand_2 and places the result in some memory location, which is then tested against the value 0x80.
“Why 0x80?” You ask, smartly. Because this number is equivalent to 0b10000000 in binary, that is, an 8-bit binary number where the only bit that is set is the most significant bit. If you tak every number that has this bit set (essentially any number larger than 0x80) and perform a logical AND operation on 0x80 and that value, the result will always be 0x80. This can be seen in the truth table below.
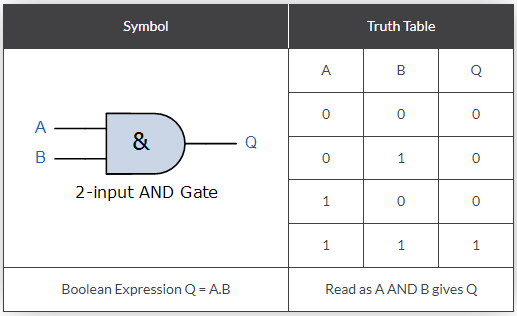
For example, say we have the number 0x9e, that is 0b10011110, this is the result:
| AND table | Hexadecimal | Binary |
|---|---|---|
| Operand 1 | 0x9e | 0b10011110 |
| Operand 2 | 0x80 | 0b10000000 |
| Result | 0x80 | 0b10000000 |
Because the only result of a logical and that returns 1 is 1 AND 1, if there is a 0 it will always return 0. In this way, this is a check to see if a number is higher or lower than 0x80 (which is 128 in decimal), or in other words, to see if the 8th least significant bit is set or not. If the check returns true, we go back and run the same block again, if false, we move on to the next block
In the next block we do the following:
- Multiply
rand_2by 32 again (redundant, probably a compiler thing) - Load into
rand_2the value stored in the same offset from the same memory location we referenced before - We then perform a logical OR operation on
rand_2with the value0x80, which is the same as setting the 8th least significant bit to 1 - Then decrease some loop variable by 1 and continue
What Is Actually Happening
So this loop does the following:
- Randomises two values
- Reference a single byte in memory using the sum of these values as an index
- Like fetching an element from an array using an index (i.e.,
board[x])
- Like fetching an element from an array using an index (i.e.,
- If 8th LSB set
- randomise an offset again
- else
- set and continue with loop
This is almost definitely the logic for random positioning of mines where the 8th LSB is marking a mine, we pick a random location on the minefield and if that location has a mine we go somewhere else, if not, we set a mine ath that location. The number of times we do this is determined by a global variable called _DAT_01005330, which is a copy of DAT_010056a4, we can rename the function to place_mines.
Dynamic Analysis
The DAT values we are interested in are unfortunately only assigned at runtime on account of the fact they are user-defined. To learn the contents of these values and gain a better understanding of the program as a whole we need to do what is called dynamic analysis, that is, run the program, attach it to a debugger, and see what is going on inside the program at runtime.
OllyDbg
To do this we first need a debugger. My preference for this workshop is OllyDbg, this is for a number of reasons (despite its advanced age and dated look).
The first reason is that it’s actually used on the course, so those of you who’ve already been through Hacking 3 will be familiar, and those of you who are yet to do that particular module have a good head start. Other reasons include its fairly simple UX (in comparison to platforms like GDB and LLVM), the fact it’s (likely) already available on the hacklab computers, and because I like the look and I’ve used it fairly recently.
It can be downloaded here and may also be available on the computers in front of you already.
Additionally, if you don’t share my love of OllyDbg, other, equally useful debuggers are available below:
As a reminder, we’re looking for the contents of the variables DAT_01005334 and DAT_01005338, which are the parameters passed to rand_caller, as well as the value of DAT_01005340, which is the base address to which the offsets (the indexes, or positions on the board) are added. To begin the process of performing dynamic analysis on winmine, do the following:
- Open OllyDbg
- Go to
File > Open(or alternatively hit F3) and then navigate to winmine.exe - You will be greeted with something looking roughly like this, again don’t worry, its actually fairly simple when you understand what each of the windows are
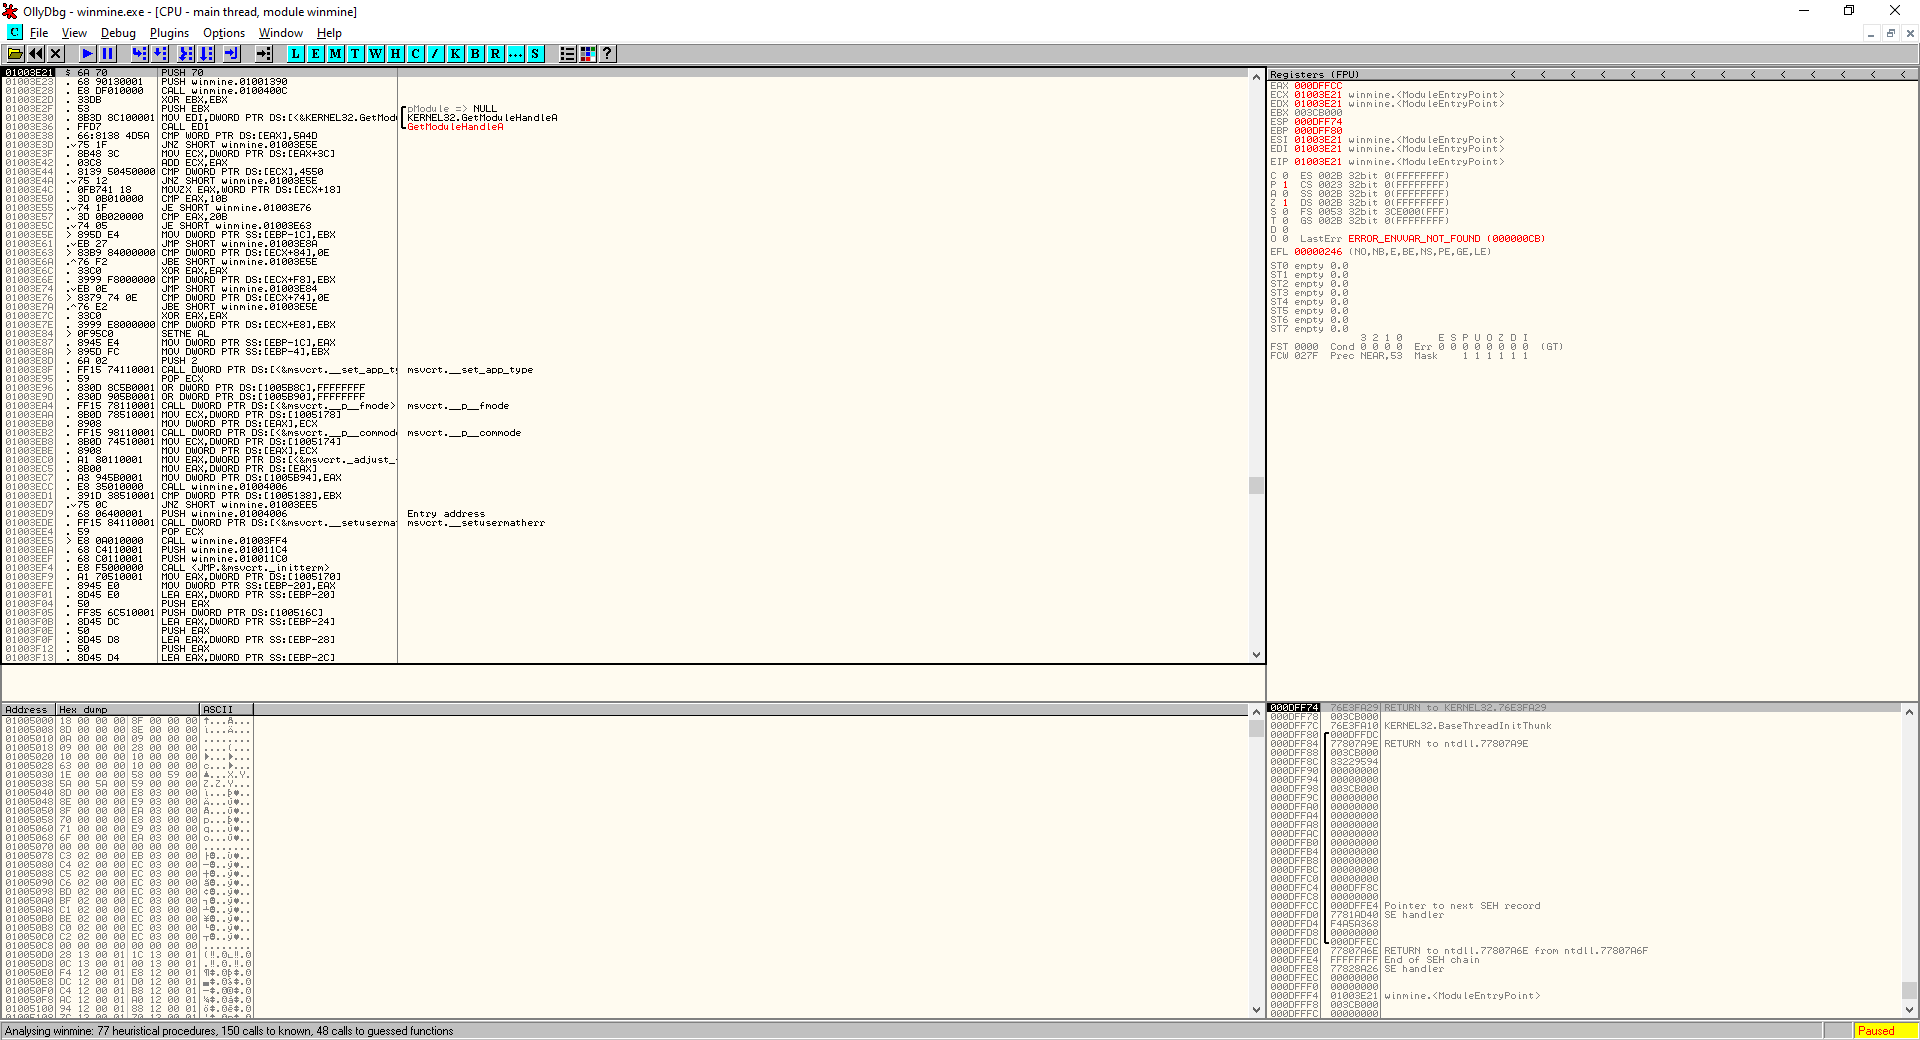
The OllyDbg window can be split into roughly four sections.
- The top left is the Disassembly Window, this is roughly the same stuff we see in Ghidra, but presented in a less neat format, there are some helpful comments though.
- The top right is the Registers Window. This window is really useful during debugging because it shows the contents of each of the registers in memory
- The bottom left is the Memory Window, this shows the hex dump of the entire program
- Finally the bottom right is the Stack Window this, helpfully, shows the contents of the stack, lol
Working With What We Know
To continue the dynamic analysis:
- Locate the beginning of the do loops mentioned earlier. If you’ll recall, this has a label in Ghidra (
LAB_010036c7), so locating it should be no issue (it’s at offset0x010036cf) - Scroll up in OllyDbg to find this address, and press F2 to place a breakpoint.
- Hit F9 to run winmine, or press the play button in the top right hand corner
- When the breakpoint is hit (should be before the board even shows up) press F8 to step over the current instruction once, make a note of the uppermost value in the stack window (bottom right), I see a 9
- This following instruction is a call, as we know from Ghidra it is a call to
rand_caller - Hit F8 twice more to get past the second push instruction. What value is pushed onto the stack? I get a 9 once again. (Consider the significance of the number 9 in Minesweeper for a moment here)
- Step through the program until you reach
0x010036e6, where we check if the 8th LSB is set - When we get to this address we can see that the value to be checked,
0F, is being displayed below the disassembly window (DS:[01005462]=0F), this means the test instruction, to test if the 8th LSB is set will return false, and if we’re right that means we’ve just come across an empty cell (no mine) - Continue to hit F8 until you reach the OR instruction. once that is done go to the address
0x01005462(or whatever one shows up for you) by right clicking and clicking “Follow address in Dump” - If what we figured out earlier is correct, the value at this address should change from
0x0Fto0x8F, the 8th LSB will be set by this instruction, due to the fact that bit was not already set.
Understanding Data In Memory
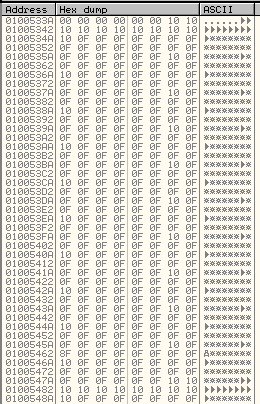
Next, we should analyse the variable at 0x01005340. If we navigate to this memory location in the memory window we see the following:
What actually is this?
- Visibly sequential series of values
- 11
0x10followed by 210x0F, adding to 32 bytes - 9*repeating chunks of 32 bytes, consisting of
- 1*
0x10 - 9*
0x0F - 1*
0x10 - 21*
0x0F
- 1*
Due to the fact Minesweeper is, by default in this instance, a 9x9 game, it is likely that the 9*0x0Fs are rows, with the 0x10s being line beginnings and ends, or “delimiters”. We can assume now, then, that 0x0F represents and empty square, and 0x8F represents a mine.
Finding The Flag’s Value
So we have empty squares, and we have mines, what about flags? Well, getting the value of a flag is trivial.
- Clear all breakpoints by highlighting the previous breakpoint and hitting F2 again
- Run the Minesweeper program, making sure to be looking at the board in the memory window
- Right click a square on the board, ideally somewhere you can easily find such as the top right or bottom left
- Click into the debugger and view the change
The flagged square has gone from 0x0F to 0x0E. Which means a flagged and empty square has to be represented by 0x0E, and a flagged and mined square has to equal 0x8E!!!
Patching
Now it’s time to modify the code, but first, of course, we need to figure out HOW we need to modify it
Some Arithmetic
Okay, so we need to turn all instances of 0x0F to 0x8E instead of 0x8F… How can we do that?
The three numbers that concern us are the following in binary:
0b00001111==0x0F0b10001111==0x8F0b10001110==0x8E
So the two differences between 0x0F and 0x8E are the first and eighth LSB, setting the 8th and un-setting the 1st will give us the desired result.
For this we can use an XOR. Specifically, 0x0F XOR 0x81 == 0b00001111 XOR 0b10000001 == 10001110 == 0x8E
Finally Actually Patching
This is it, the home stretch. Perform the following actions:
- Find the address of the OR instruction in OllyDbg (We know from Ghidra this address is
0x010036FA) - Click on the address and hit Spacebar, which will bring up an assembly dialog box
- Replace the contents of the box with
XOR BYTE PTR DS:[EAX],81 - Click on “assemble” and then hit Esc
Right click on Disassembly Window > Copy to executable > All modifications > Copy all > right click again > Save file > specify name and location- Open the file from its location
AND YOU’RE DONE!!!
Congratulations, Hacker :)
This workshop brought to you by Isaac Basque-Rice